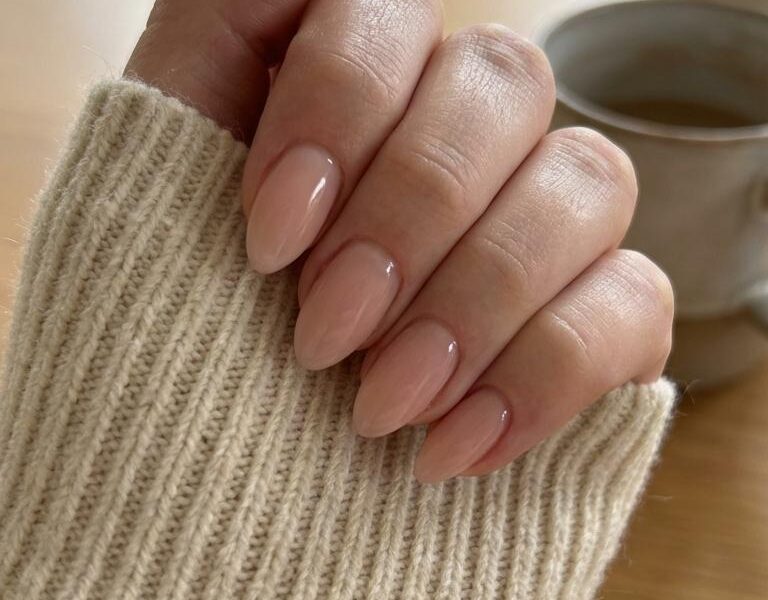

1. The Ethereal Glow of Pastel Transition Nails
Just as the sky transforms into a kaleidoscope of hues during sunrise, pastel transition nails transport us to a realm of subtle beauty. Imagine the gentle dance of pale lavender, soft blush pink, and serene gold, melting into the morning blue. It’s a sight that embodies tranquility and perfection.
Now, envision this breathtaking scenery on your nails. That’s precisely what pastel transition nails offer – an enchanting fusion of colors that’s sweeping the world, from skilled nail artists to everyday individuals seeking a fresh and magical look.
The best part? This captivating trend is accessible to anyone. With the right inspiration and some basic technique, you can create these stunning nail designs. This guide will be your compass, guiding you through 29 breathtaking ideas, from beginner-friendly basics to intricate multi-color masterpieces.
2. Unpacking the Concept of Pastel Transition Nails
As with any trendy phenomenon, understanding the terminology is crucial. “Transition nails” can evoke different interpretations depending on who you ask, making it essential to establish a common ground.
3. Deciphering the Core Concept
At its essence, pastel transition nails involve a harmonious blend of two or more soft, muted colors, which can shift, fade, or blend seamlessly into each other. This can manifest as a single-nail ombré or a full-set gradient, where each finger gradually transitions through various pastel shades. Some designs boast an effortless blend, while others create a beautiful watercolor effect where colors meet.
4. The Enduring Allure of Pastel Transition Nails
Pastel transition nails occupy a unique space where artistry meets wearability, making them a lasting fixture rather than a fleeting trend. They exude sophistication, softness, and versatility, allowing you to experiment with endless combinations. Moreover, their visually stunning quality makes them a photographer’s dream.
The 29 nail ideas presented below capture the full spectrum of this aesthetic, from single-nail gradients to multi-color sets, and from beginner-friendly techniques to press-on shortcuts. Whether you’re a seasoned nail enthusiast or just starting out, there’s something to suit your skills and nail length.
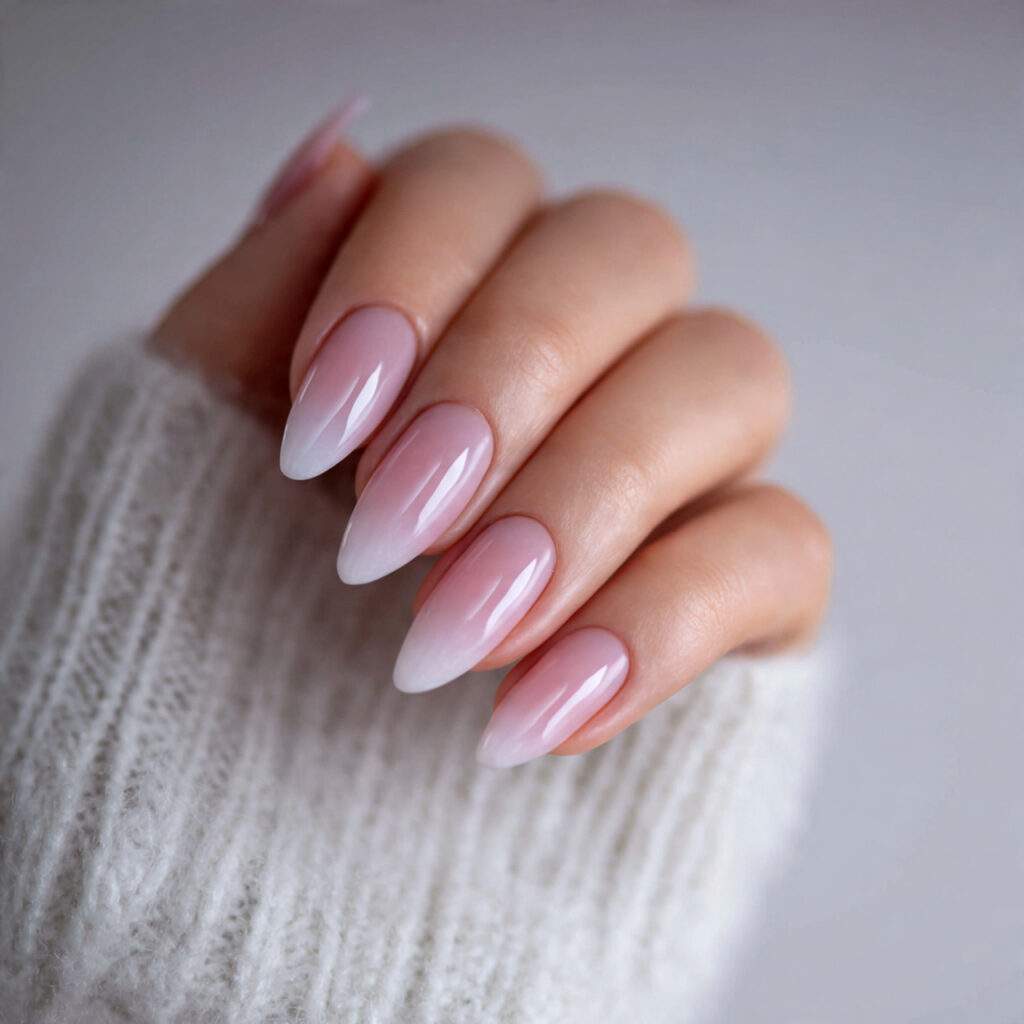
5. The Timeless Classic: Single-Nail Gradient Nails
These designs form the foundation of the pastel transition world, showcasing a single nail, two colors, and an breathtaking blend that never fails to impress.
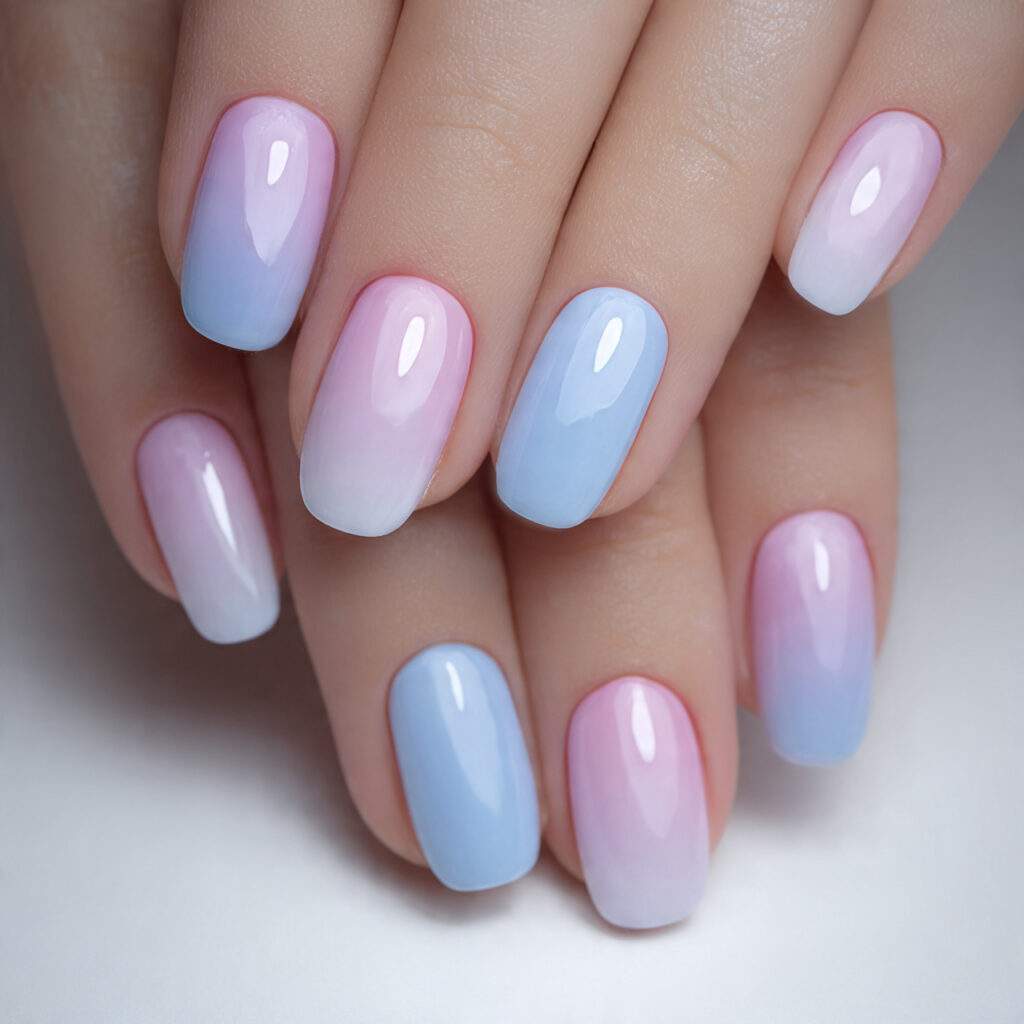
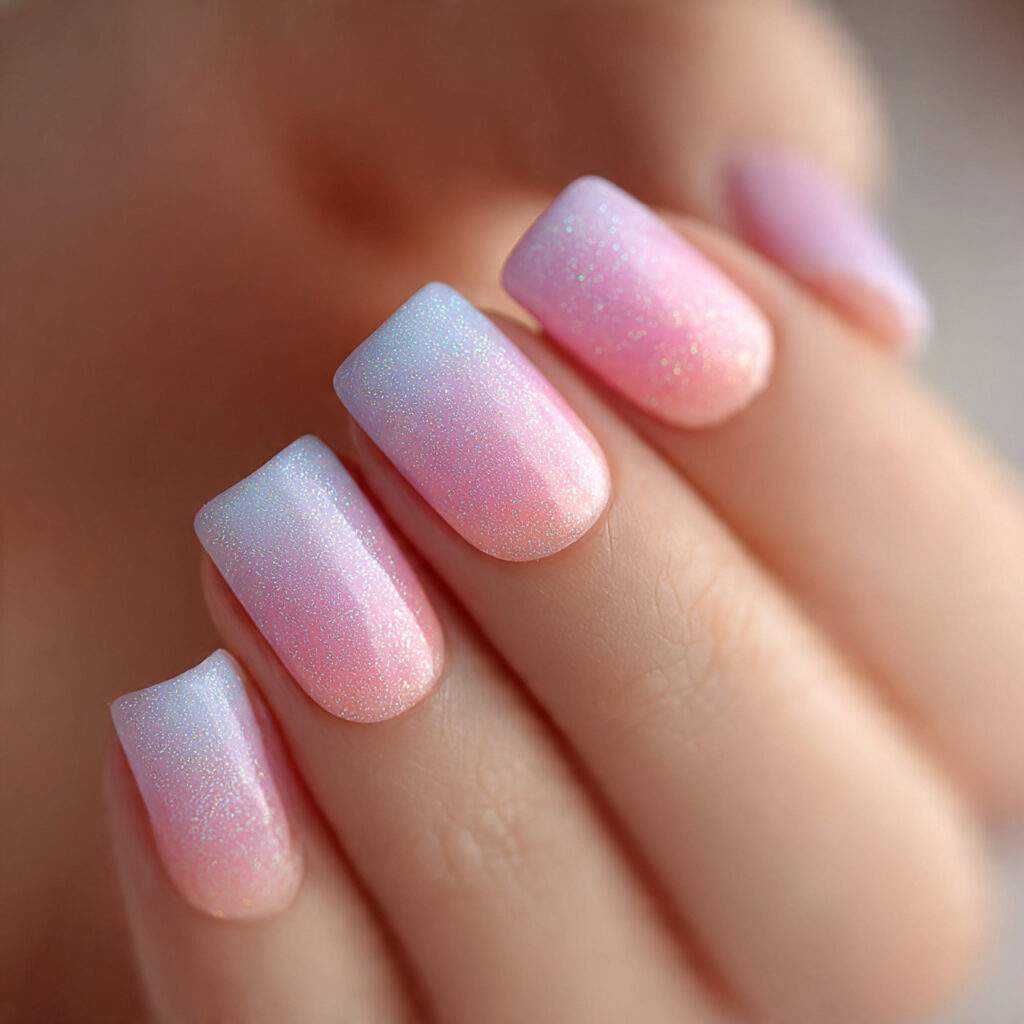
6. A Harmonious Union: Lavender and Baby Pink
The synergy between lavender and baby pink lies in their proximity on the color wheel, allowing them to blend harmoniously while still maintaining distinct contrast. The resulting transition evokes the delicate edge of a flower petal, where two colors coexist in perfect harmony.
Layering the Perfect Ombre
Why It Works
Achieving a seamless ombre effect involves understanding the nuances of color combination and blending techniques. When done correctly, the result is a subtle, sophisticated look that transitions from one shade to the next without any harsh lines. By carefully selecting the right colors and techniques, you can create a truly eye-catching effect.
How to Do It
Start by applying the darker shade from the base up, typically occupying two-thirds of the nail. Then, apply the lighter shade from the tip down, also covering two-thirds of the nail. To create a seamless blend, use a small makeup sponge to dab and smooth out the transition area in short, gentle strokes. Finish off the look with a high-gloss top coat to seal in the colors.
Avoiding Common Pitfalls
Why It’s Important
A well-executed ombre requires attention to detail, especially when it comes to selecting the right shades. Using colors that are too similar in depth can result in a lackluster effect, making the transition between the two shades almost invisible. To achieve a striking ombre, it’s essential to choose shades that have a noticeable difference in tone and saturation.
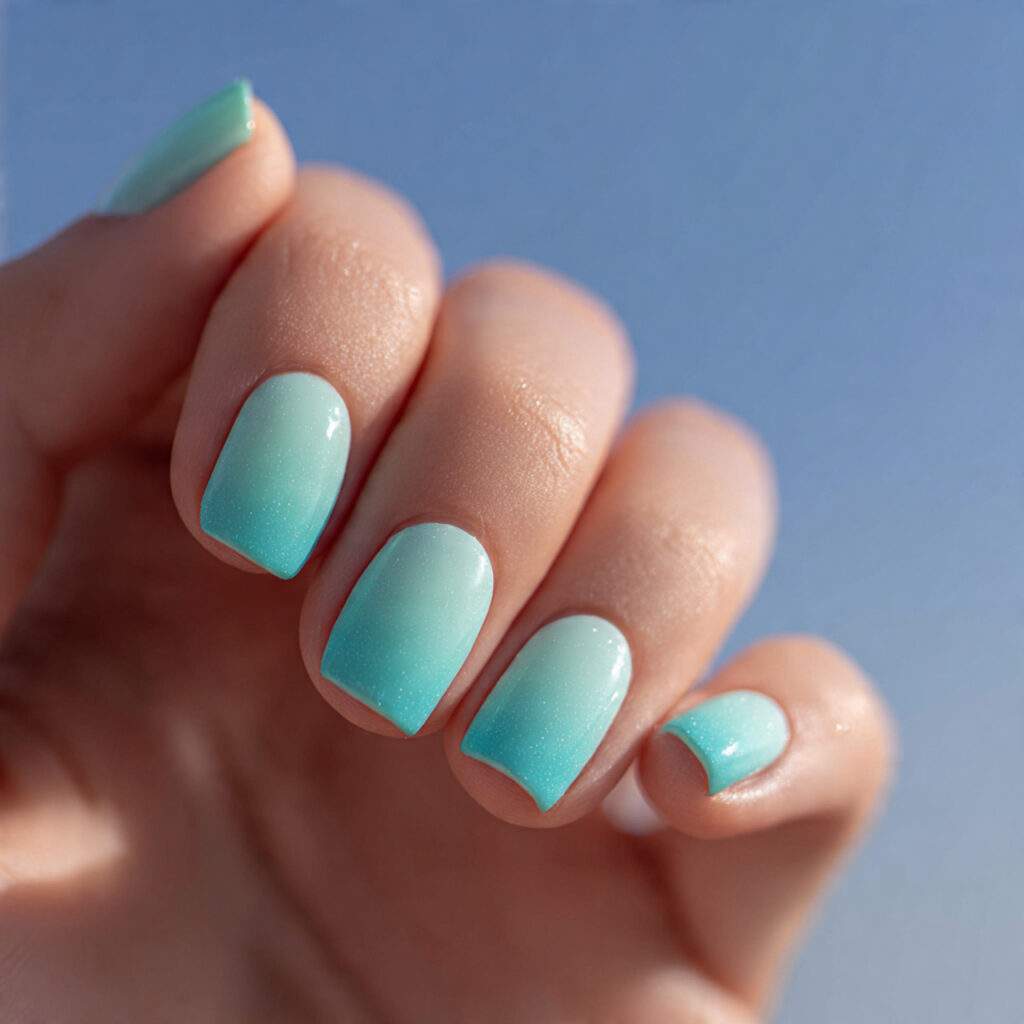
Mint to Soft Blue
Why It Works
This particular color combination is a refreshing twist on traditional pastel shades. The cool tones of mint and soft blue evoke a sense of calmness and serenity, making it an ideal choice for spring and summer. When applied to shorter nails, the look appears crisp and clean, while longer nails can pull off a more ethereal, watercolor-inspired effect.
How to Do It
For this ombre, the sponge technique is particularly effective. Paint the two shades onto a makeup sponge in overlapping strips, then gently dab the sponge onto the nail, moving slightly between applications to maintain an even blend. Aim for three to four sponge layers to achieve the perfect gradient.
Insider Tip
To make the ombre even more striking, try applying it over a sheer white base. This subtle difference in color will not only make the ombre more vivid but also provide a beautiful canvas for the colors to shine on.
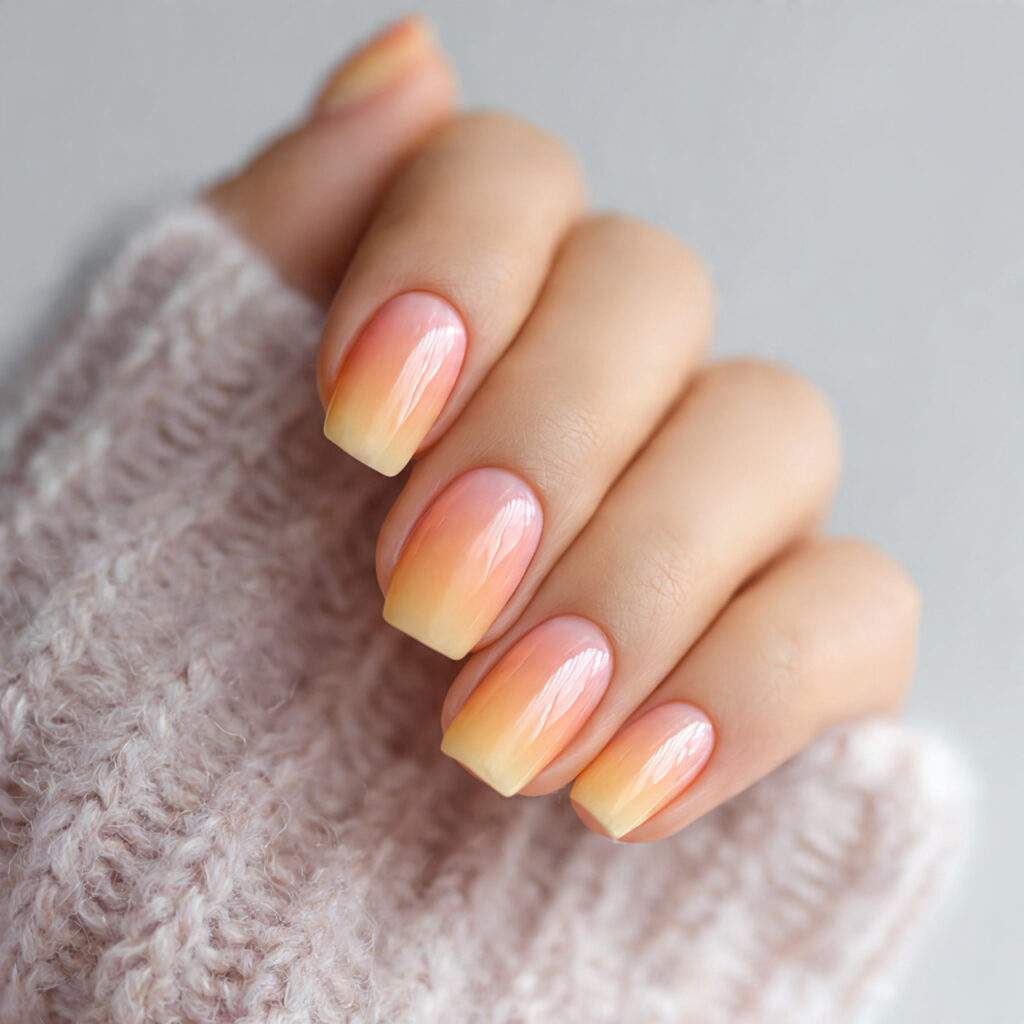
Peach to Creamy Yellow
Why It Works
Warm pastel shades, such as peach and creamy yellow, have a unique ability to capture the essence of a sunset. When applied in an ombre effect, they create a warm, inviting atmosphere that’s hard to resist. This particular combination is often overlooked, but trust us, it’s a hidden gem in the world of pastel ombres.
How to Do It
Apply the peach shade from the base and the creamy yellow shade from the tip, blending them at the center with a sponge. Since both shades have a warm tone, they will blend smoothly without creating any harsh lines or muddy zones.
Common Mistake
A common mistake when working with peach and yellow is choosing a shade that’s too bright or saturated. In pastel ombre, the yellow should be pale and creamy, with just a hint of yellow, to create a soft, subtle transition.
Blush Pink to Ivory
Why It Works
For those who prefer a more understated ombre look, blush pink fading to ivory is an excellent choice. This sophisticated combination is both elegant and clean, making it suitable for any occasion. Its unique blend of color and texture creates a romantic, ethereal effect that’s hard to resist.
How to Do It
Apply the blush pink shade from the base and the ivory shade from the tip, blending them in the center with a sponge. To achieve the perfect blend, make sure both shades are sheer or semi-sheer, creating an ethereal transition rather than an abrupt one. Seal the look with a glossy top coat for a stunning finish.
Lilac to Soft Beige
Harmonious Hue
The subtle fusion of lilac and white creates an enchanting visual effect, reminiscent of gazing through a misty veil. The delicate blend of colors is both captivating and understated, leaving onlookers to ponder the nuances of this captivating nail art.
Brushwork Technique
To achieve the desired wispy effect, swap your sponge for a fan brush. The softer strokes produced by the fan brush perfectly capture the ethereal quality of this pastel combination. By gently feathering the lilac upwards and the white downwards, you’ll create a seamless transition between the two hues.
Finishing Touches
The addition of a pearl shimmer top coat serves as the crowning glory for this color combination. The resulting iridescence imbues the fade with an extra dimension, elevating it to a truly show-stopping effect.
Building Blocks
These initial five designs serve as the foundation for the more elaborate looks that follow. As you continue reading, you’ll discover how to build upon these basic principles to create even more breathtaking nail art.
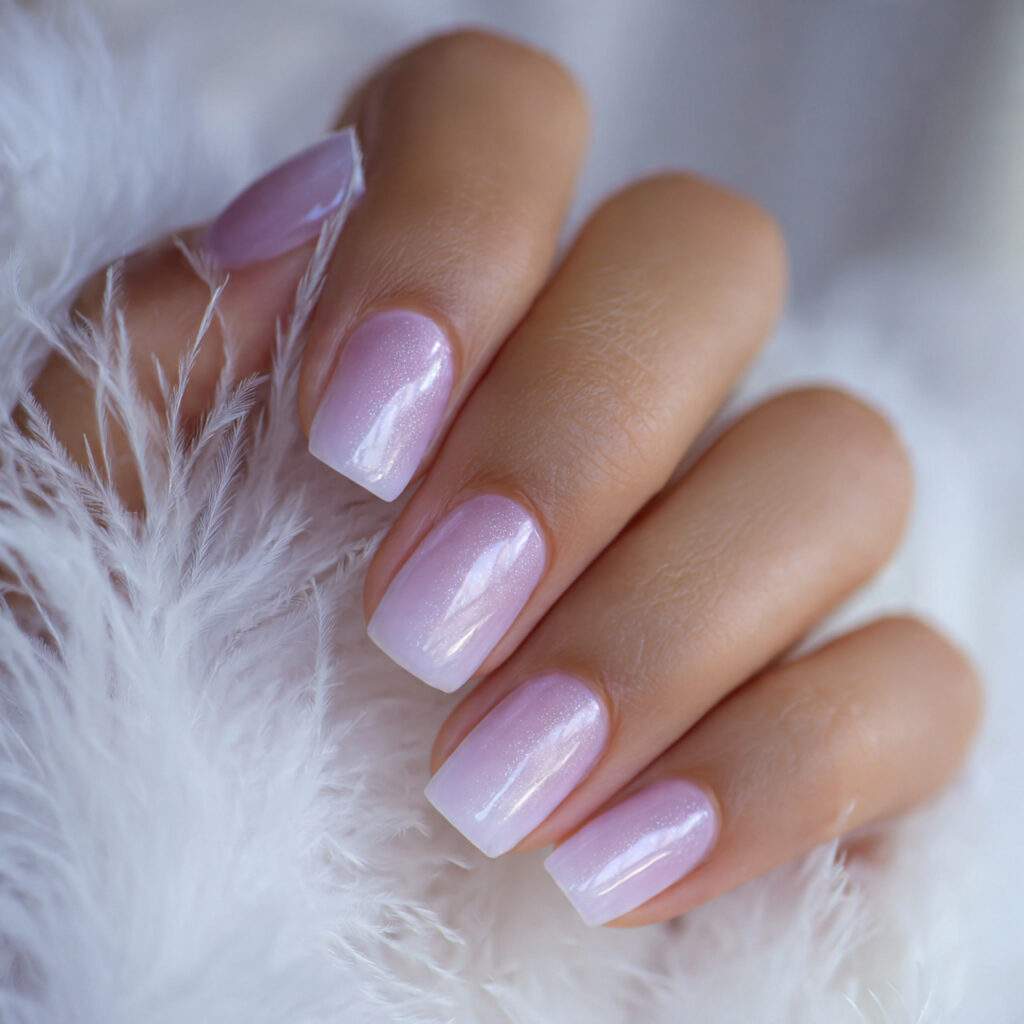
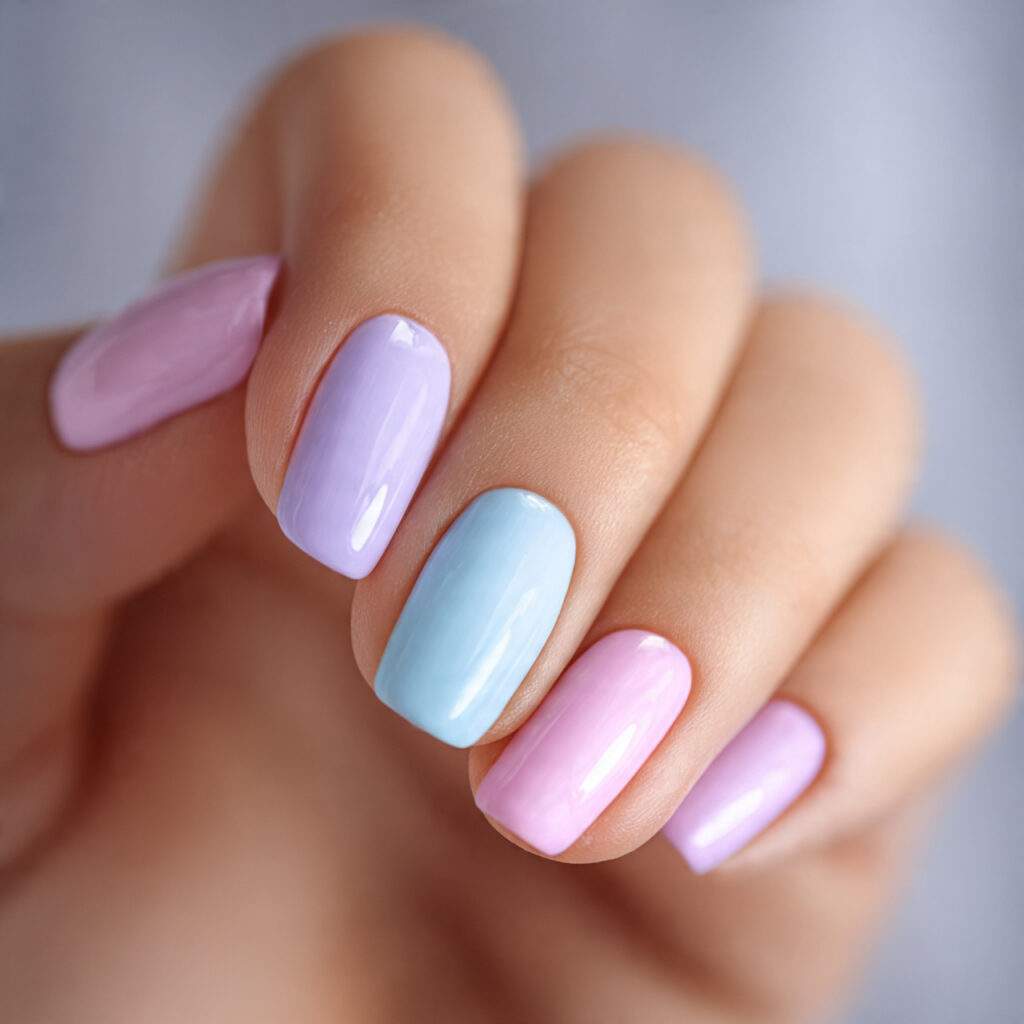
Spectrum of Color
For those who crave something more elaborate, multi-color pastel transitions offer a realm of creative possibilities. By extending the principles outlined above, you can create breathtakingly beautiful nail art that defies convention.
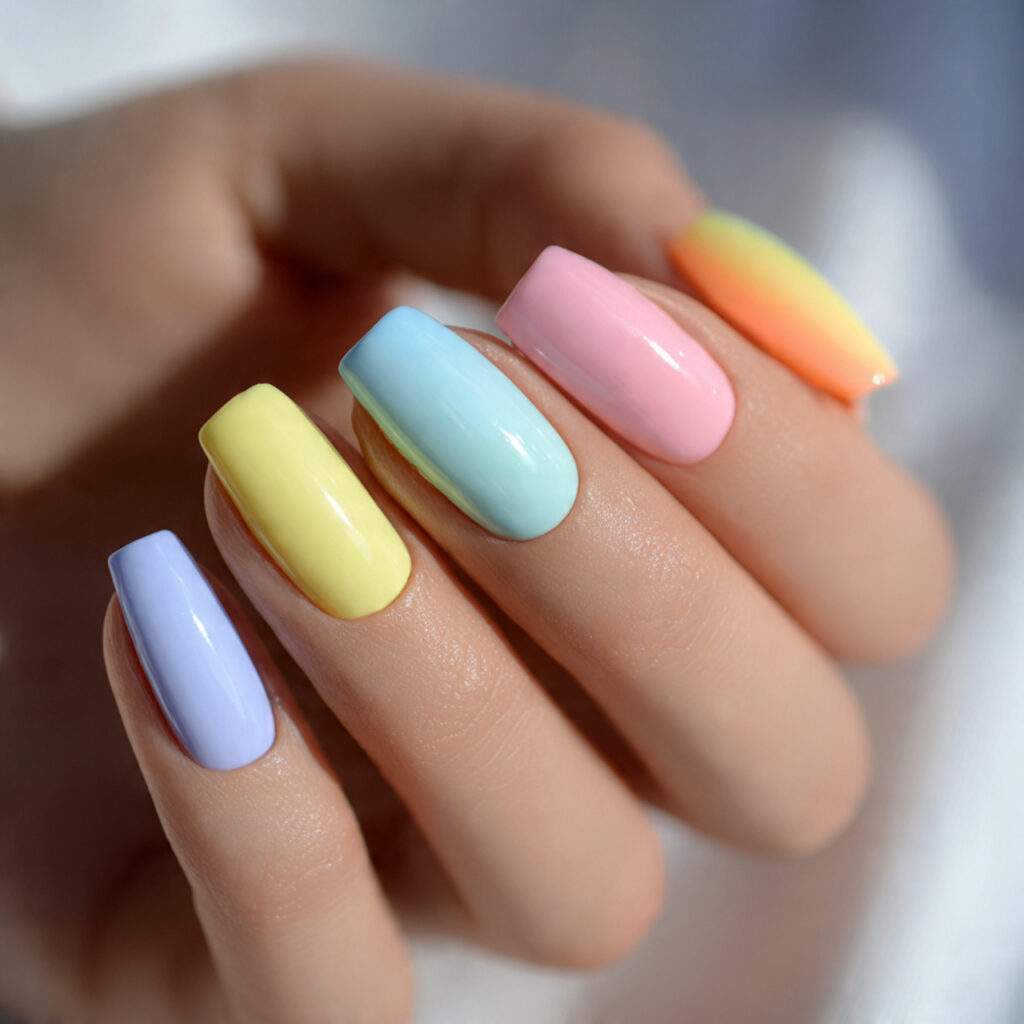
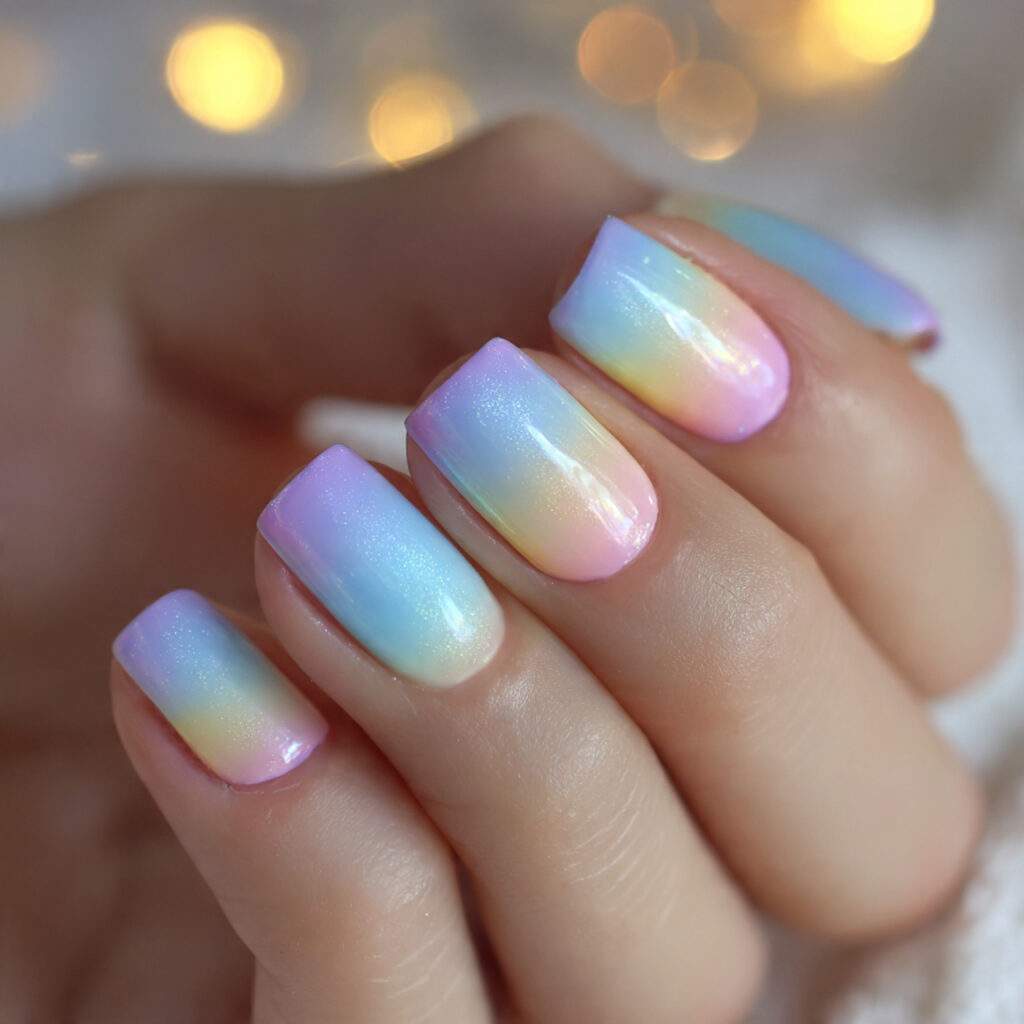
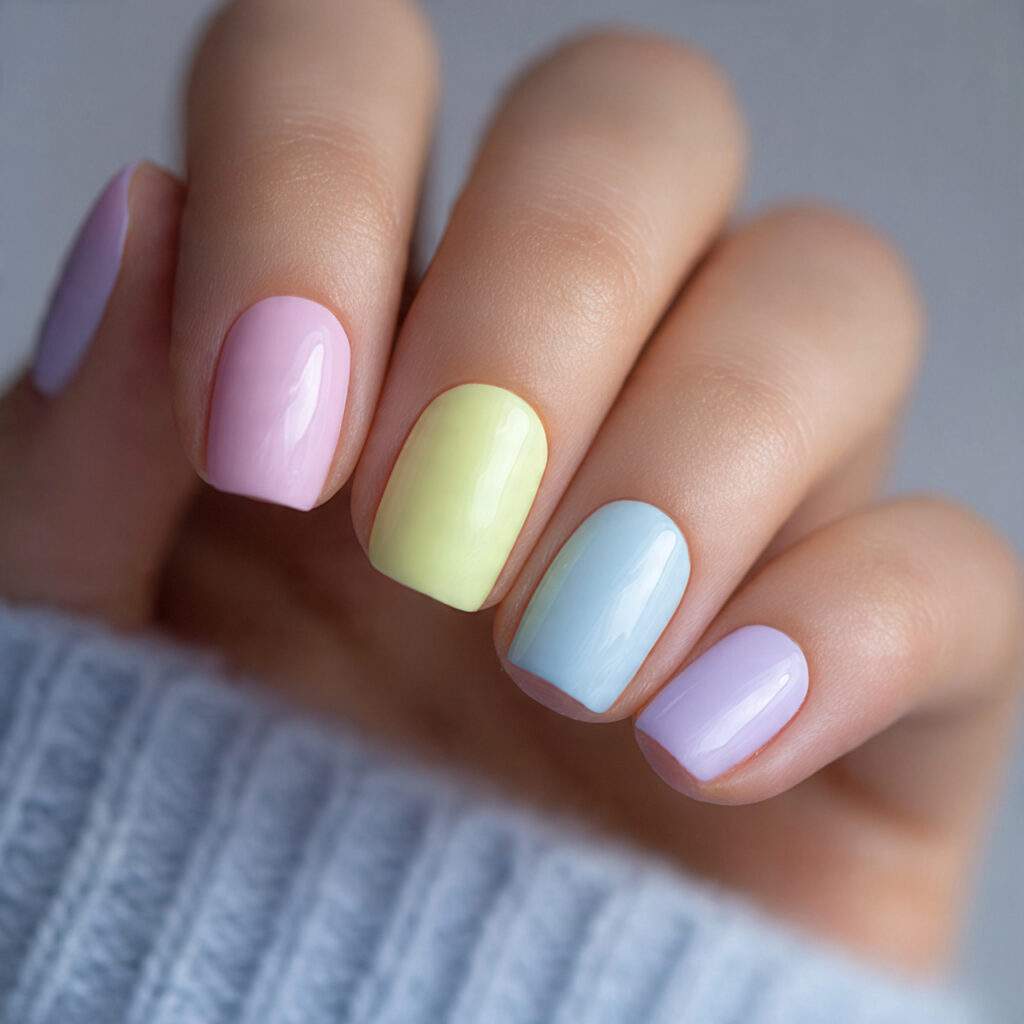
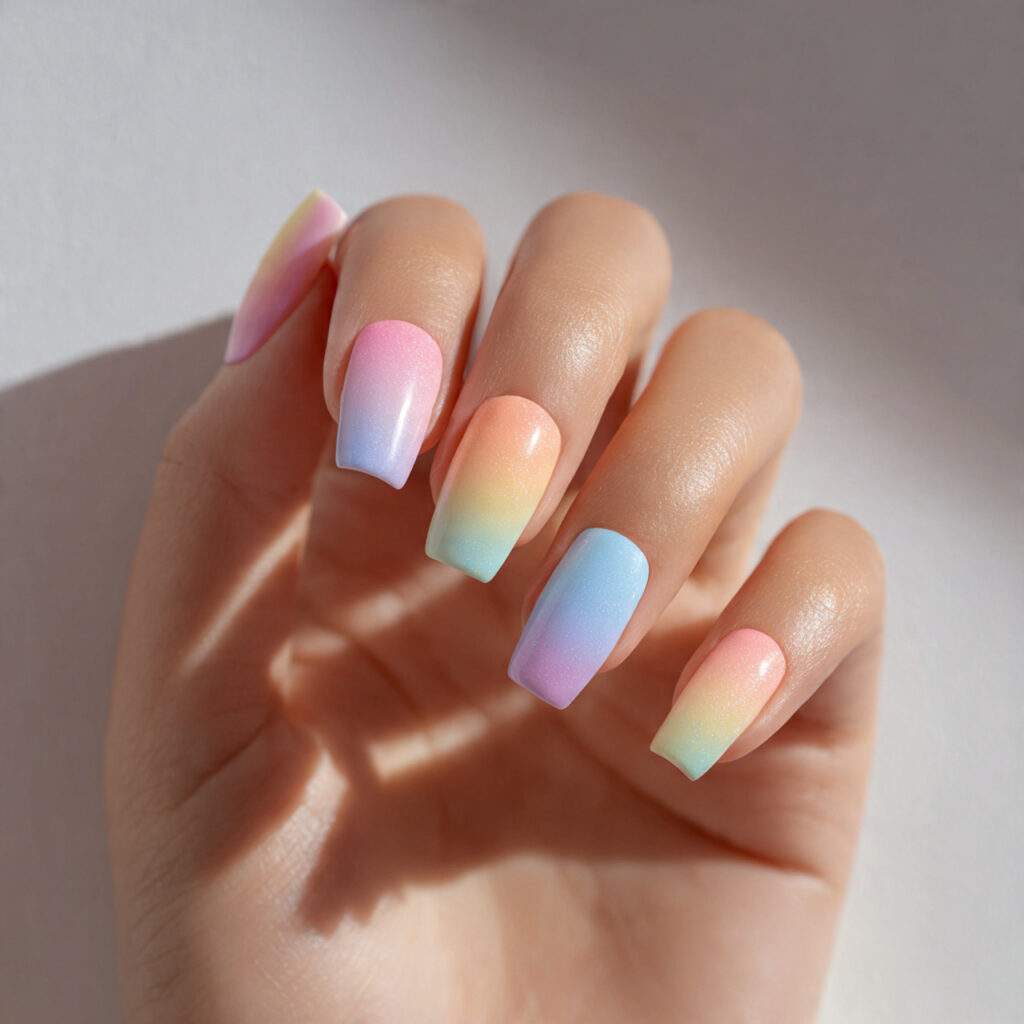
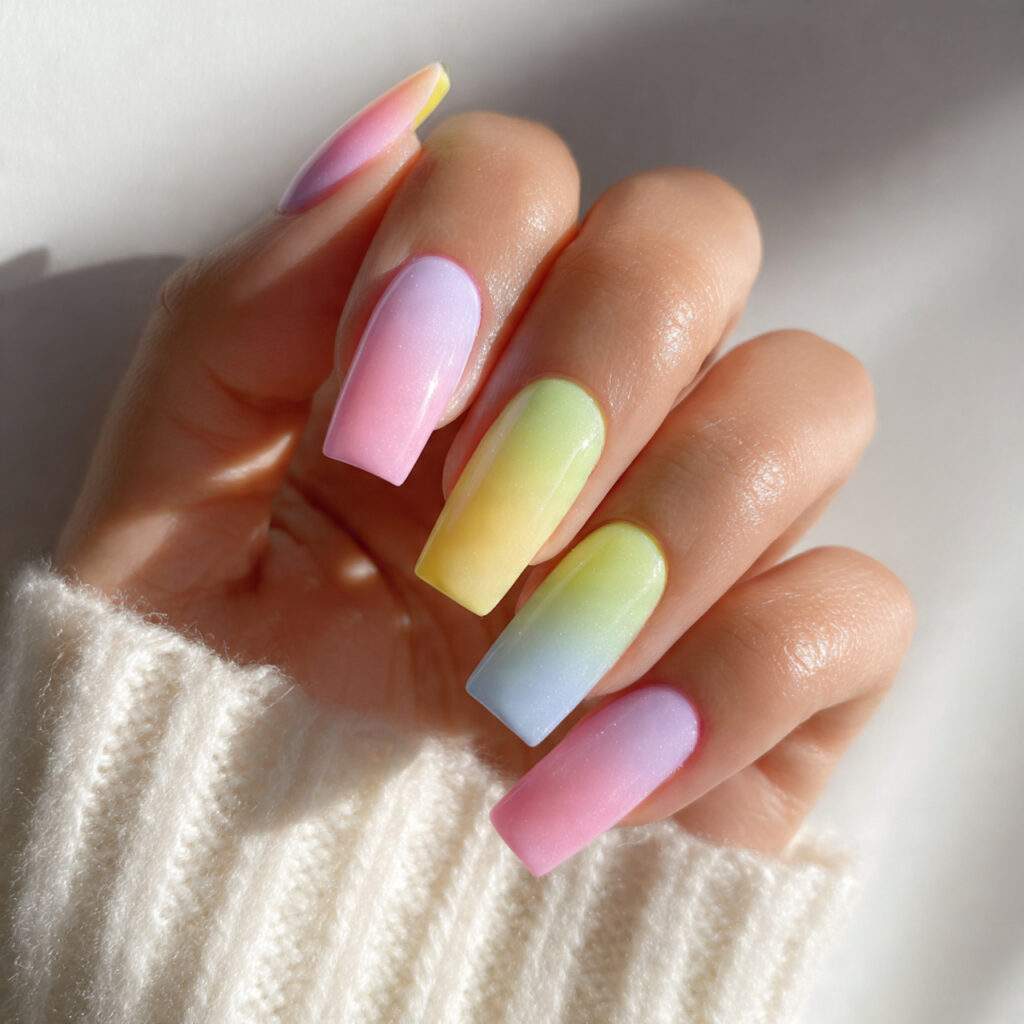
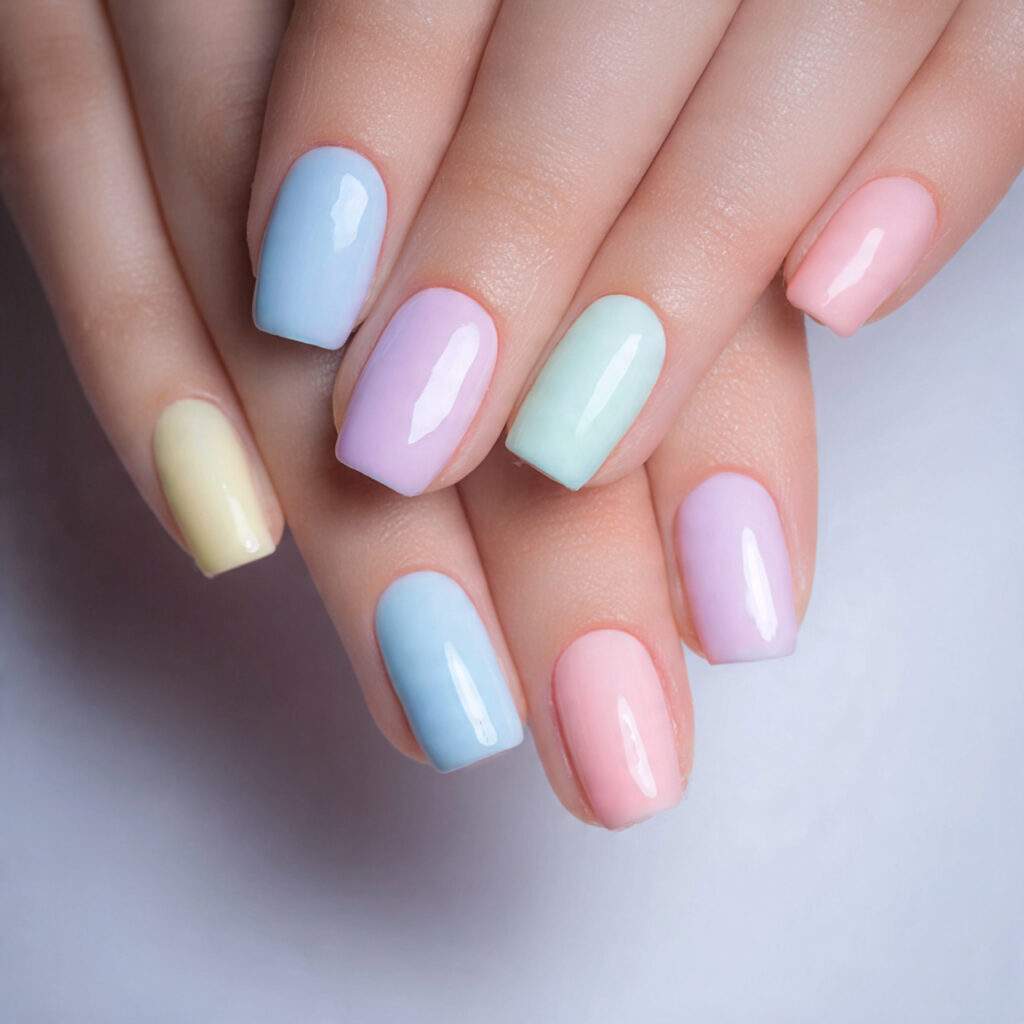
Rainbow Pastel Set
Whispers of Color
A full pastel rainbow spanning ten nails, each in a distinct hue, is a true masterpiece of nail art. The harmonious blend of pastel shades, moving seamlessly through the spectrum, creates a visually stunning effect that is both bold and gentle.
7. Colorful Harmony
To achieve this effect, assign each nail a specific position within the rainbow, ranging from soft red-coral to sky blue. By rendering each nail a solid pastel, you’ll create a cohesive look that’s both playful and sophisticated.
8. Pitfalls of Pastel Pairing
When working with a rainbow set, it’s essential to avoid selecting pastels that vary significantly in depth or saturation. A cohesive look requires that all shades feel equally soft and muted, lest one nail disrupt the dreamy uniformity of the set.
Tri-Color Gradient
Layered Beauty
A three-color gradient on a single nail is the perfect embodiment of the transition look – a dramatic yet wearable effect that’s tempered by the softness of the pastel shades. The lavender-to-blush-to-peach gradient is a stunning example of this concept in action.
Mastering the Blend
To create this effect, apply each color in roughly equal thirds of the nail, then blend each boundary with a sponge. The key to success lies in blending one transition fully before moving on to the next, thus preventing the muddying of all three shades.
Alternating Gradient Set
Visual Rhythm
By employing two pastel gradients that alternate between fingers, you can create a captivating nail art design that’s both visually striking and rhythmically engaging. Nails one, three, and five fade from lilac to mint, while nails two and four transition from blush to sky blue, creating a mesmerizing dance of color across the set.
How to Make It Work
Plan out your two gradient combinations in advance, then apply one to the alternating nails, letting it dry completely before moving on to the second. This contrast between the color stories makes each individual nail stand out more than a uniform set.
9. Diagonal Pastel Gradient Effect

What Makes It Stand Out
Diagonal gradients move corner to corner, creating a more architectural effect than traditional vertical fades. This unique approach looks both artistic and modern, setting it apart from more conventional nail art.
How to Create It
Start by applying your base color in one corner and your second color in the opposite corner. Blend the colors diagonally across the nail using a sponge, or use nail tape applied diagonally to help define the boundaries.
Expert Tip
Diagonal gradients look particularly stunning on longer, more rectangular nail shapes, such as coffin and soft square shapes, as the diagonal has more room to develop and create a visually appealing effect.
10. Pastel Ombré Across the Entire Hand

The Key to Success
This cohesive version of the transition nail concept features all five nails on one hand graduating through a continuous spectrum. The pinky starts with the palest shade, each finger getting slightly deeper or more saturated, with the thumb in the richest version of the color. The result is a beautiful watercolor wash effect across your entire hand.
How to Achieve It
Select one color family, such as pinks, blues, or purples, and find five polishes within that family ranging from barely-there pale to slightly more visible. Apply one shade per nail in order, with no blending needed within each nail. The transition happens between the nails, creating a seamless gradient effect.
Common Pitfall
Avoid choosing shades that vary too dramatically, as this can make the set look disjointed rather than a unified gradient. Instead, opt for subtle, noticeable transitions between each nail.
Pastel Transition Nail Art: Combining Color and Detail
When gradient and nail art come together, the result is often breathtaking. These ideas showcase the best of both worlds, blending the softness of transition nails with the femininity of nail art.
11. Pastel Gradient With Delicate Floral Accent
What Makes It So Effective
A soft ombré base paired with a small, delicate flower painted on one or two accent nails combines the beauty of transition nails with the charm of floral nail art. The gradient does the heavy lifting visually, while the flowers add a personal touch that makes the whole set feel special.
How to Add the Touches
Complete your gradient first on all ten nails and let it dry completely. Then, use a fine nail art brush to paint tiny blossoms or five-petal flowers in white or a slightly deeper shade from the gradient palette on the ring finger nails.
Elevating Your Nail Game
Harmonious Hues
To create a cohesive look, pair flowers in a white or pearl shade with a pastel gradient. This thoughtful combination keeps the overall aesthetic refined, rather than busy and overwhelming.
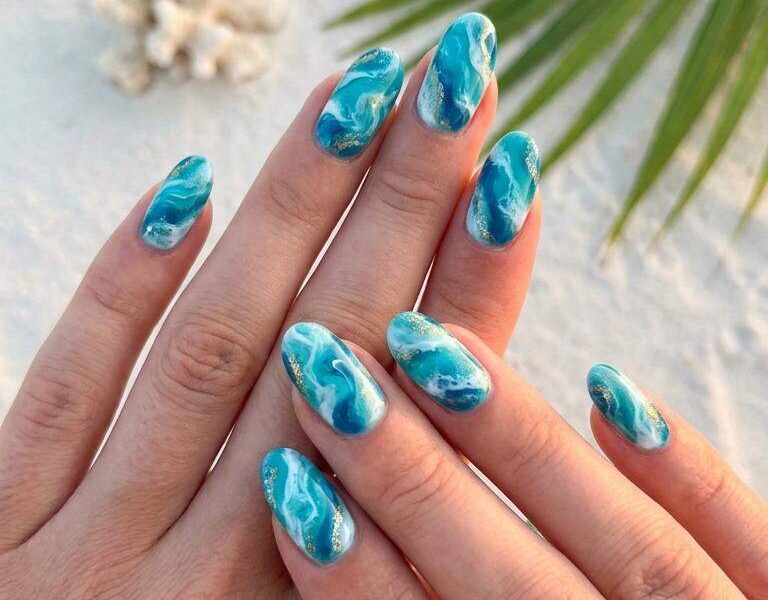
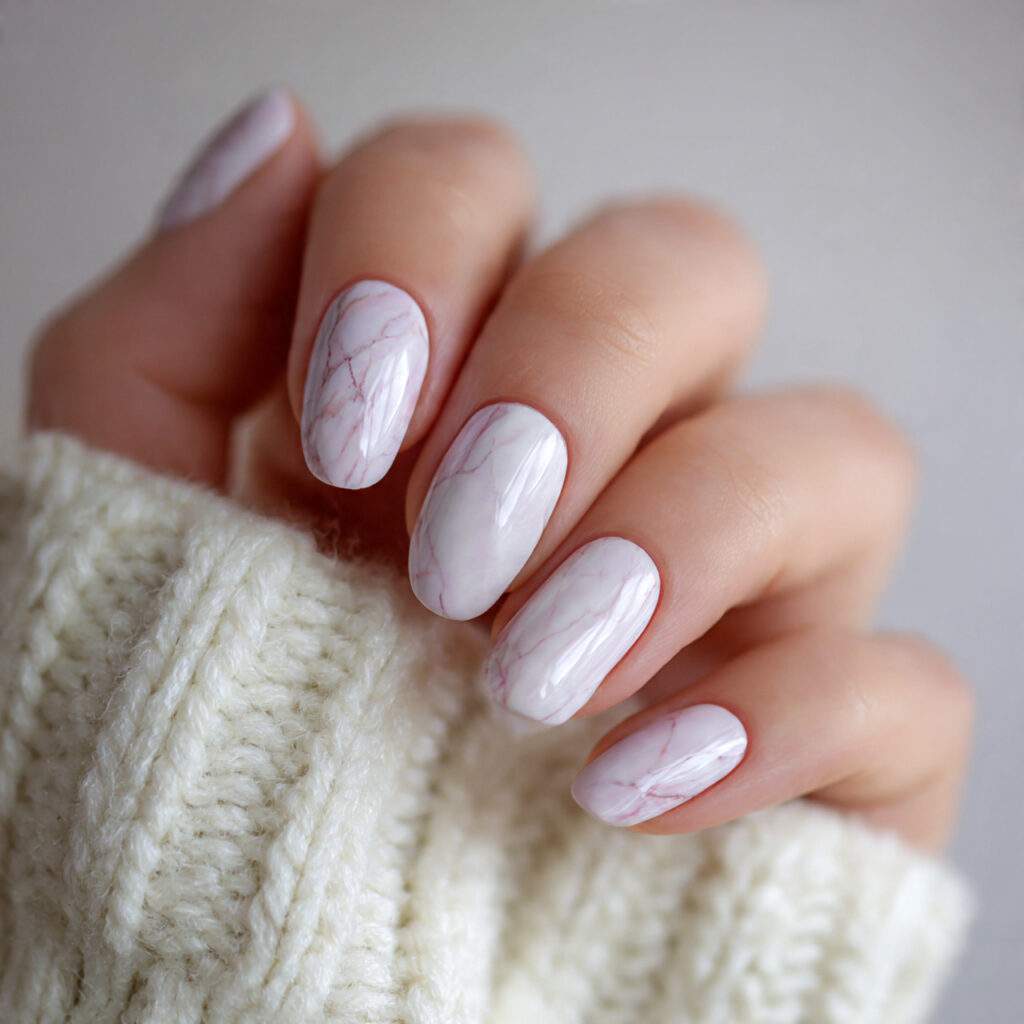
Marble Pastel Masterpiece
Why It Works
The union of soft marble veining and a pastel gradient base is a match made in heaven. The organic texture and movement of the marble effect imbue the color blend with a sense of natural elegance, elevating it from a simple painted nail to a work of art.
How to Do It
Begin by completing the pastel gradient base. Using a fine nail art brush or a delicate piece of plastic wrap, gently drag a slightly darker version of one of the gradient shades across the surface in thin, irregular lines. The goal is to evoke the unpredictable pattern of marble veins.
Common Mistake
Don’t overdo it with the veining – it should be soft and subtle, just a shade or two deeper than the background. This will create a sense of shadow and texture rather than bold contrast, which can detract from the overall effect.
Pastel Perfection
Why It Works
A delicate white or pearl French tip paired with a pastel gradient base is the epitome of elegance. The ombré underneath adds depth and dimension, while the French tip provides a precise, high-shine finish. This look is both romantic and sophisticated, making it perfect for any occasion.
How to Do It
Create your gradient base as usual. Once dry, apply French tip tape in a curved or straight line near the nail tip and paint the tip in a soft, milky white or pearl shade. Remove the tape carefully and seal with a high-gloss top coat.
Artistic Expression
Why It Works
A watercolor wash nail is all about embracing imperfection and creating a soft, organic look. Multiple pastels blend and overlap in a loose, random way, evoking the feel of color applied to wet paper.
How to Do It
Apply a light coat of clear base. While still slightly tacky, dab two or three pastel shades onto the nail using a sponge or your fingertip, allowing them to overlap loosely. Resist the urge to blend methodically – the beauty lies in the unpredictable, artistic quality of the finished look.
Insider Tip
Keep the color coverage light and translucent for this technique. This will help create the signature watercolor effect, rather than a messy, opaque finish.
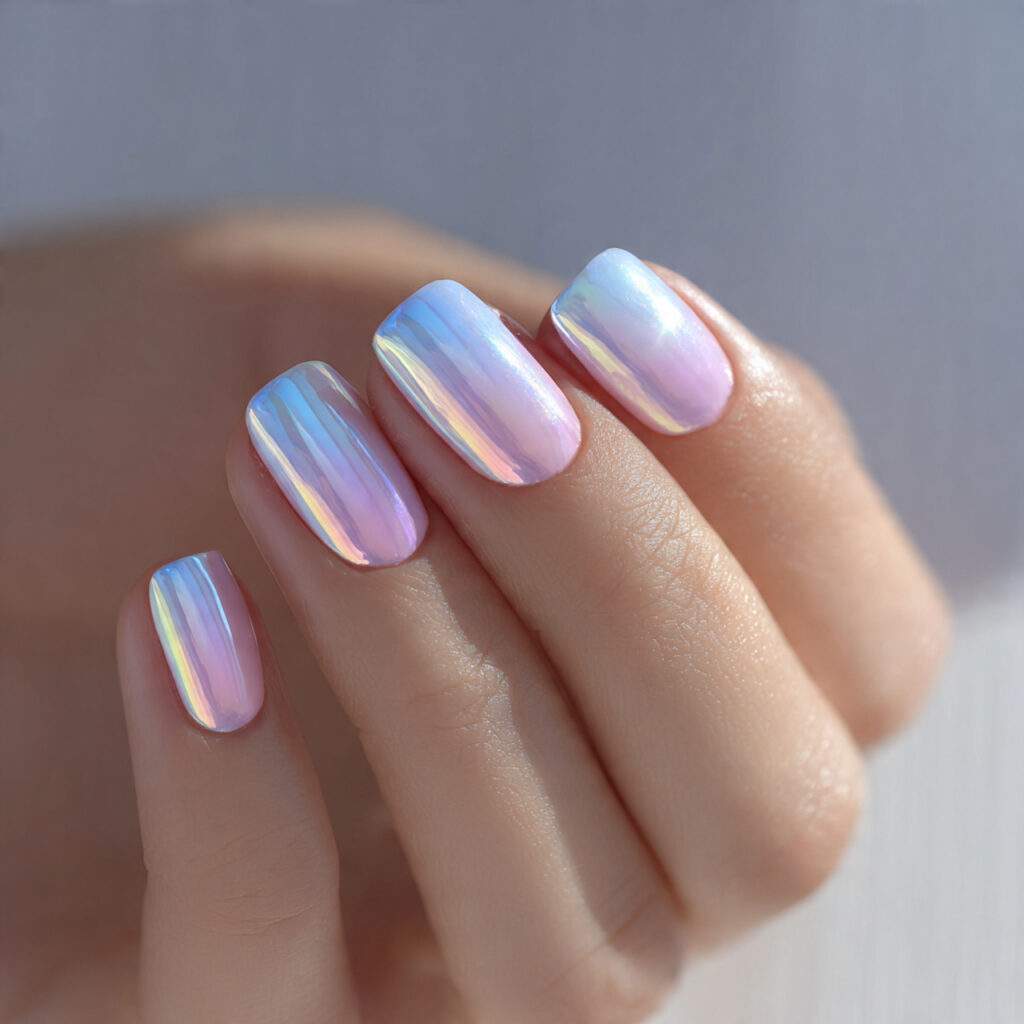
Pastel Chrome Fusion
Why It Works
Combining chrome powder in pastel tones with a gradient base creates a look that’s both soft and futuristic. The reflective quality of chrome amplifies the color shift of the gradient underneath, making every movement of your hand catch the light in a mesmerizing way.
Unlocking the Perfect Chrome Nail Look
Achieving a mirror-like finish at home requires a bit of creativity, but with the right techniques, you can replicate the look of a professional nail salon. Apply a chrome nail powder over a tacky gel-like top coat to create a similar effect. Experiment with different chrome shades over each section of the gradient for a striking, multi-tonal chrome effect.
Mastering the Art of Negative Space Nail Art
Negative space nail art has a distinct, modern appeal, especially when paired with pastel transitions. By intentionally leaving sections of the natural nail bare, you can create a gradient that appears in specific zones while the rest remains clear or lightly frosted. This unique approach elevates the design from a simple gradient to a work of art.
Technique Tips for a Seamless Negative Space Gradient
To create a beautiful negative space gradient, use nail tape to mask off sections of the nail. Choose a diagonal strip, a half-moon at the base, or a geometric shape near the tip. Apply your gradient to the unmasked area and carefully remove the tape while the polish is still slightly wet. Finish with a glossy top coat to seal the design.
Common Pitfalls to Avoid in Negative Space Nail Art
One common mistake when working with tape is applying it to polish that’s too wet or too dry. If the polish is too wet, the tape will lift the polish, while too dry polish will create a ridge. To avoid this, aim for the tacky-but-set stage, usually around two minutes after application.
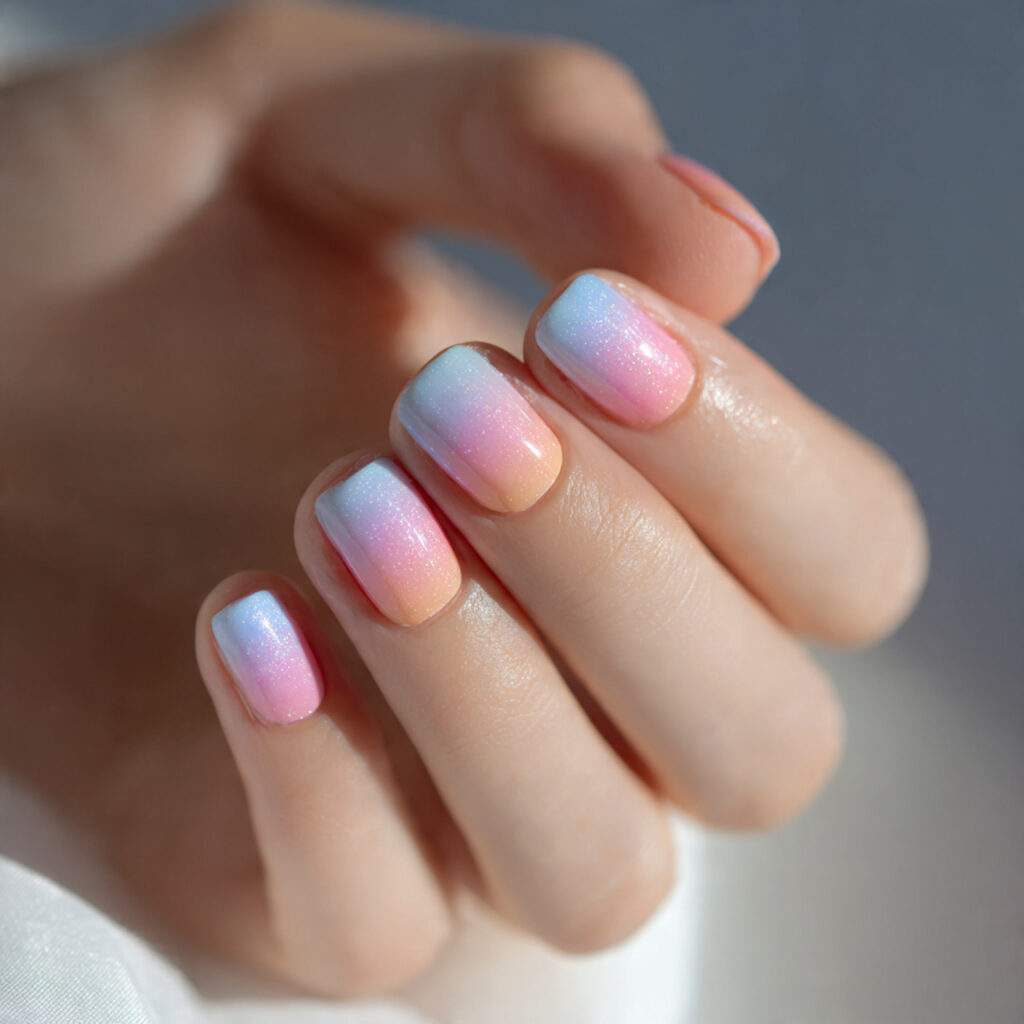
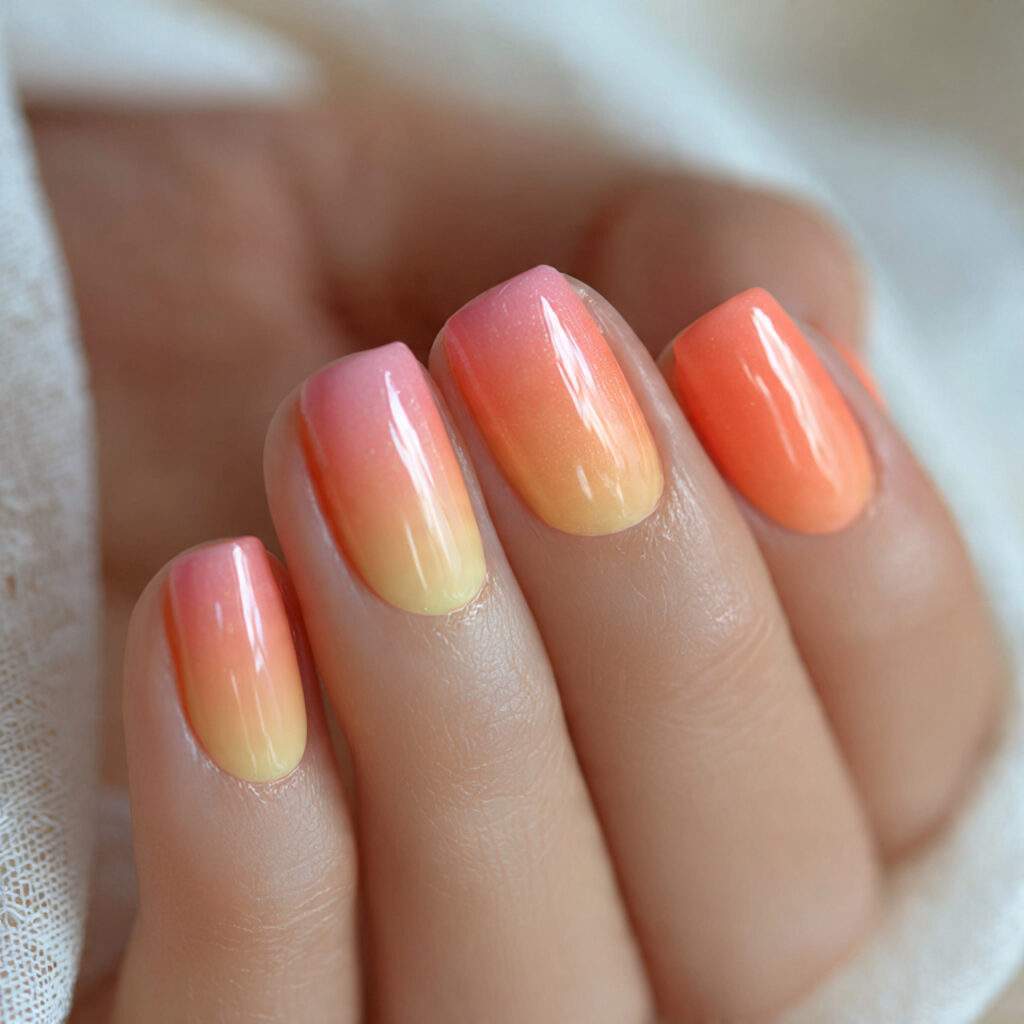
Captivating Sunset Pastel Nails
Sunset pastel sets have a mesmerizing effect on viewers, evoking feelings of beauty and wonder. This look features a gradient that fades from coral at the base to peach and pale yellow at the tip, mimicking the palette of a sunset sky. The reason behind its appeal lies in the emotional connection we have with sunset colors, which are often associated with feelings of serenity and beauty.
Step-by-Step Guide to Creating Sunset Pastel Nails
To achieve this stunning look, apply a three-shade sponge gradient moving vertically from coral to peach and finally to yellow-cream at the tip. Ensure that all three shades stay within the warm pastel family, as any deviations will disrupt the sunset effect.
Enchanted Aurora Pastel Nails
Aurora pastel nails transport you to a world of iridescent wonder, reminiscent of the northern lights. To create this look, start with a gradient base in cool pastels (mint, periwinkle, lavender) and finish with a strong iridescent or holographic top coat that adds a mesmerizing shimmer to the color blend.
Bringing Aurora Pastel Nails to Life
Begin by applying a cool pastel gradient and then finish with two coats of aurora or holo top coat. These are widely available in both gel and regular formula, ensuring that you can achieve this look at home. The iridescence will read differently under every light source, making these nails endlessly captivating.
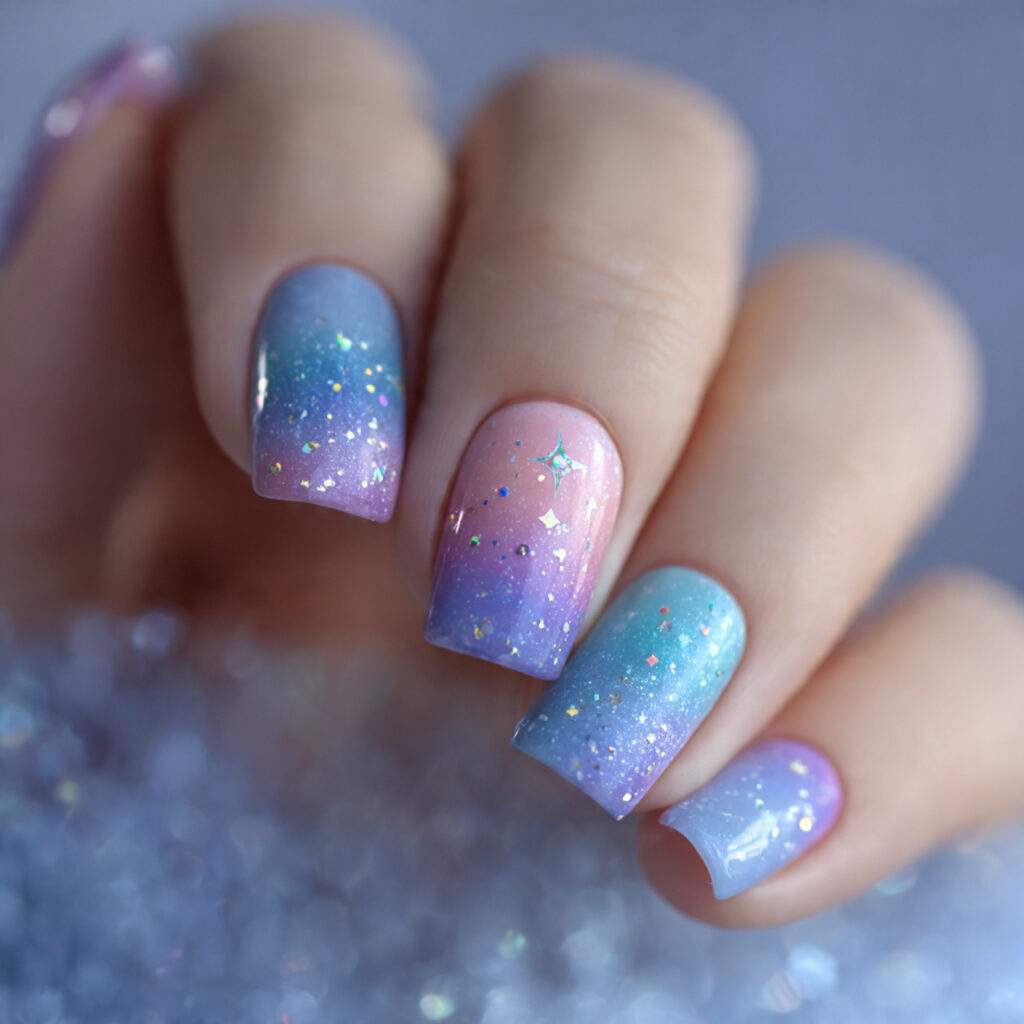
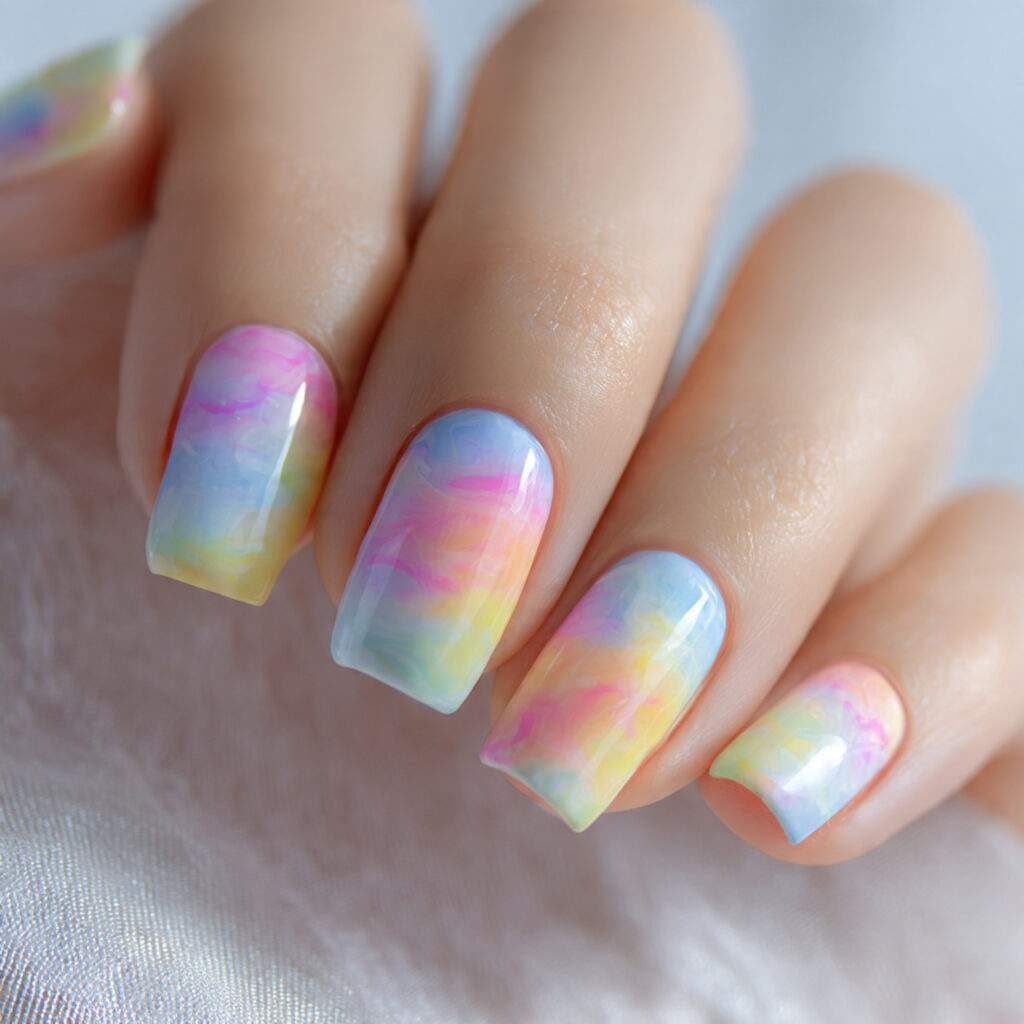
Whimsical Pastel Galaxy Gradient
Pastel galaxy nails evoke a sense of softness and dreaminess, rather than boldness. To create this look, start with a dark blue or purple base that’s left out entirely. Instead, blend lavender, periwinkle, soft teal, and dusty pink together in a loose, cosmic way that hints at stars and space without going dark.
A Step-by-Step Guide to Creating Pastel Galaxy Gradient
To achieve this look, use the dabbing technique with a makeup sponge, applying three to four pastel cool shades in overlapping sections. Once dry, add tiny dots of white over the top to suggest stars. Finish with a holographic or fine glitter top coat for the final cosmic touch.
The Art of Tie-Dye Pastel Nails
Tie-dye pastel nails are a celebration of color and creativity. By applying multiple pastel shades in a random, swirling pattern, you can create a design that’s both unique and eye-catching. Experiment with different pastel shades and techniques to achieve the perfect tie-dye effect.
Unveiling the Tie-Dye Effect
Tie-dye nail art harnesses the beauty of swirling, circular color application to create an enchanting, ethereal effect that diverges from the conventional gradient look. When executed in pastel shades, the tie-dye effect assumes a whimsical, playful quality that is anything but overwhelming.
Mastering the Water Marble Technique
The water marble technique is an ideal fit for tie-dye nail art: drop pastel polishes one at a time into a small cup of room-temperature water, then swirl with a toothpick to create a mesmerizing pattern. As you dip your nail through the surface, the colors adhere in a swirled design that requires practice but yields unparalleled results.
Insider Wisdom for Water Marble Success
Timing is crucial when working with water marble: polish on water dries rapidly, so have everything prepped before opening the bottles. To ensure effortless cleanup, coat the skin around your nail with Vaseline or liquid latex beforehand. With these insider tips, you’ll be well on your way to achieving show-stopping tie-dye nail art.
Next Steps: Elevating Your Pastel Transitions
The next section delves into more advanced and creative transition ideas, showcasing some genuinely breathtaking designs. While it’s tempting to dive in, take a moment to appreciate the complexity and artistry that goes into these looks.
Show-Stopping Pastel Transition Ideas
These ideas push the boundaries of the pastel aesthetic, introducing more intricate, artistic, and personalized elements that speak directly to your unique style.
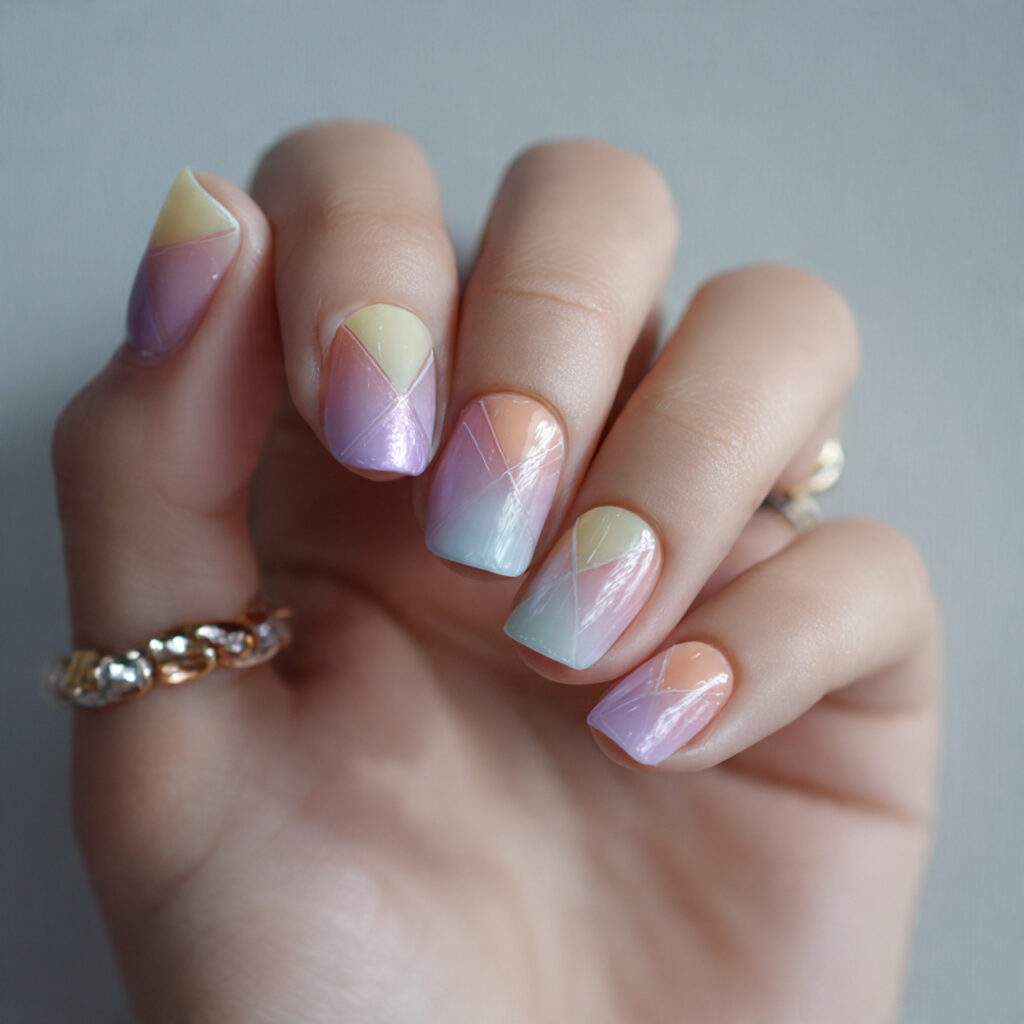
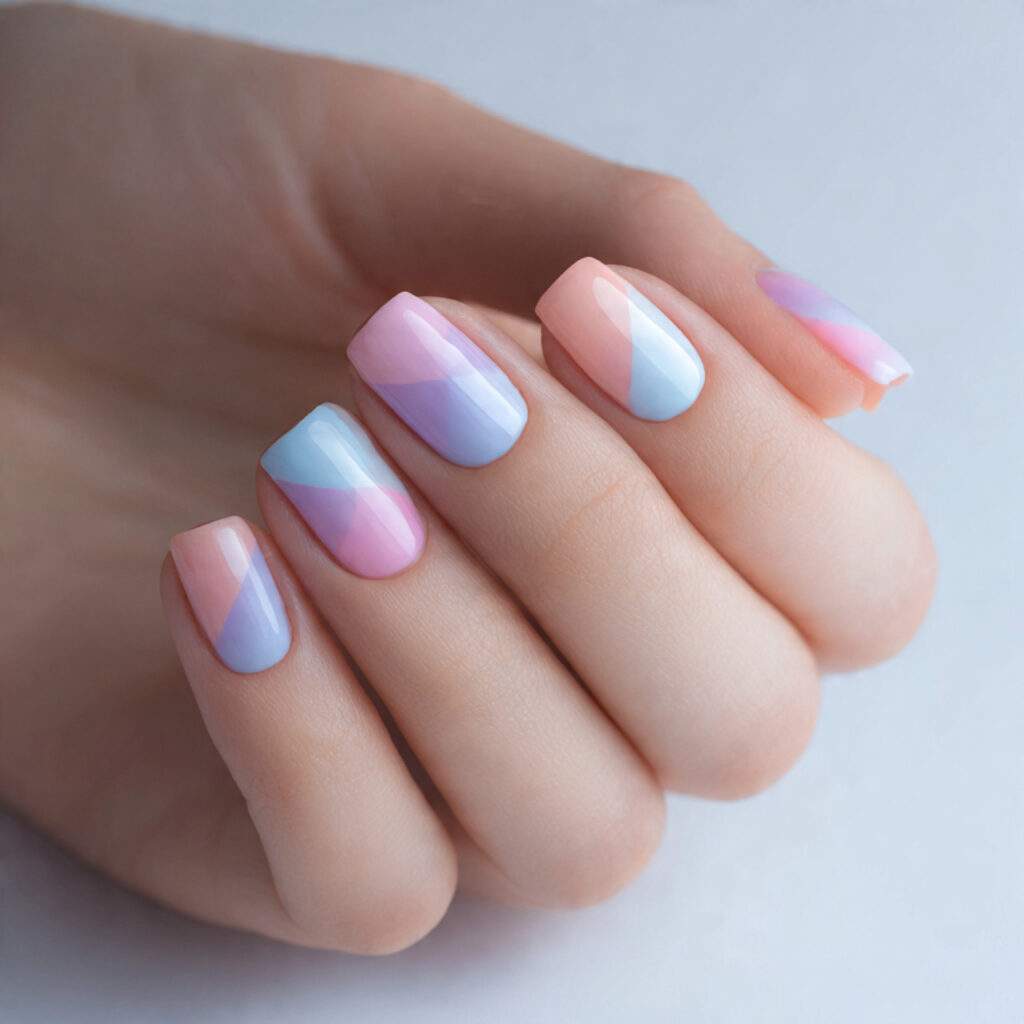
12. 21. Pastel Geometric Gradient

Why It Works So Well
The fusion of clean geometric lines and soft pastel colors creates a visually striking contrast that exudes sophistication. The structure of geometry provides a precise backdrop for the dreamy softness of pastels, resulting in a look that’s both refined and artistic.
13. How to Achieve This Look

Utilize nail tape in geometric arrangements on the nail surface, then apply gradient color within the taped zones. Remove the tape carefully to reveal clean edges that provide a striking contrast to the soft pastel blends. This look is sure to leave onlookers impressed.
14. 22. Softening Color Blocking with Pastels
Why It Works So Well
By incorporating deliberately blended edges into color blocking, you can transform a bold, high-contrast look into something softer and more artistic. Two or three pastel zones on one nail, each bleeding slightly into the next, create a visually appealing effect that’s both soothing and visually interesting.
15. How to Create This Look
Apply the first pastel in the lower third of the nail, followed by the second in the middle third and the third in the upper third. While all are still wet, use a clean fine brush to gently stroke the boundaries between zones, softening the edges without fully blending. This nuanced approach creates a look that’s both delicate and captivating.
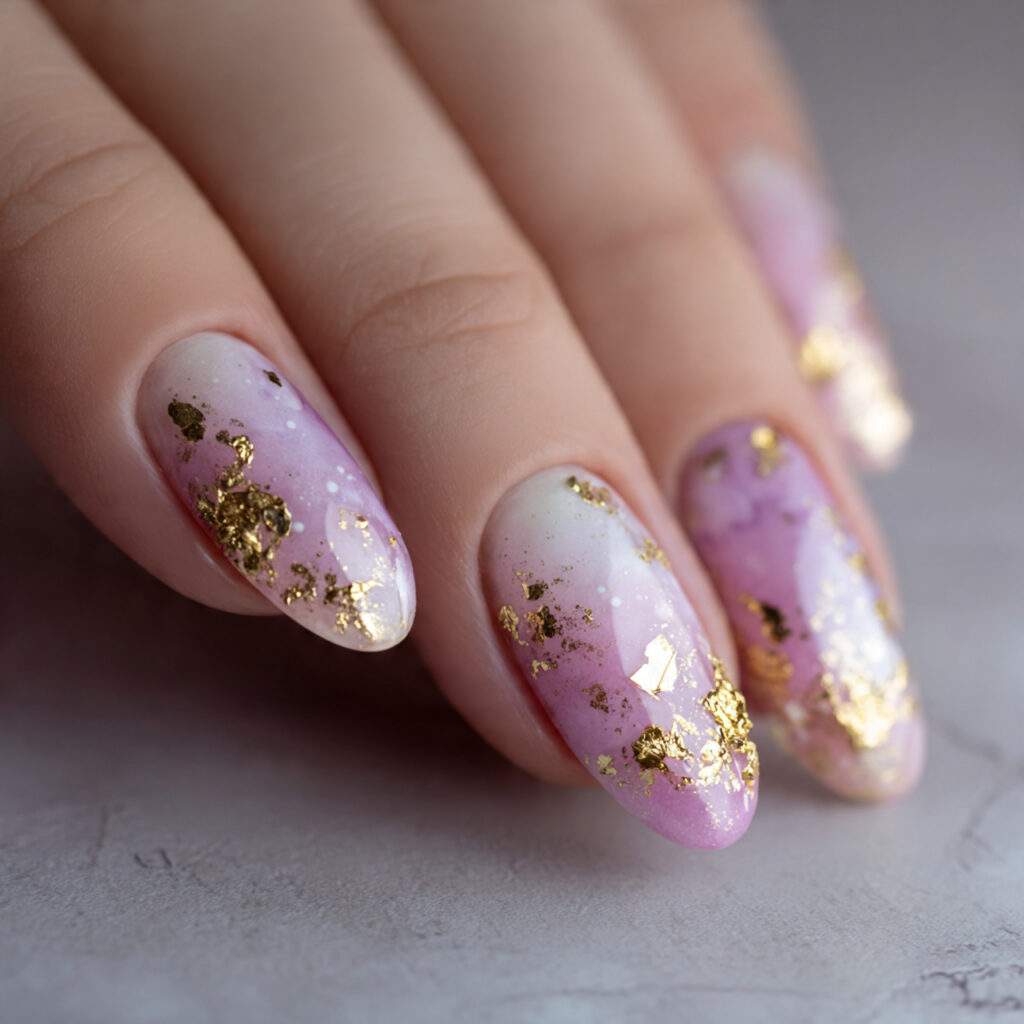
16. 23. Adding Luxe with Foil Pastel Transitions
Why It Works So Well
Gold or rose gold foil pieces applied sporadically over a pastel gradient infuse the look with a high-end, editorial quality. As the foil catches light differently from the pastel underneath, it creates a layered, multidimensional effect that’s undeniably artistic.
17. How to Incorporate Foil into Your Design
Complete your gradient base, then apply small torn pieces of gold foil over a tacky top coat layer, pressing firmly and peeling back. Seal with high gloss to reveal the intentionally textured, torn-edge quality of the foil pieces. This adds a touch of luxury to your pastel nail art.
18. 24. Adding Dimension with Shimmer Dust Pastel Gradient
Why It Works So Well
Shimmer dust applied over a pastel gradient creates a captivating, multidimensional effect that adds depth and visual interest to the design. As the light catches the shimmer dust, it catches the eye, creating a truly show-stopping look.
Why It Works
The synergy between iridescent shimmer powder and a pastel gradient is nothing short of magical. When applied over a tacky top coat, this combination creates a captivating effect that bridges the gap between chrome and glitter looks. The shimmer becomes an integral part of the gradient, imbuing the entire nail with a radiant glow.
25. The Art of Pastel Ombré Press-Ons for Beginners
Why It Works
Not everyone is inclined to tackle the sponge gradient technique at home, and that’s perfectly okay. The good news is that high-quality press-on nails in pastel gradient designs have reached an unprecedented level of sophistication. They not only look stunning but also boast a durability that can last up to two weeks with proper preparation, all while offering an array of pastel combinations to suit every taste.
Insider Tip
To ensure optimal adhesion, prep your natural nails by buffing and cleaning with alcohol before applying press-ons. A clean, slightly roughened surface significantly enhances the bonding process. Start by applying the press-on from the cuticle edge, pressing firmly down toward the tip.
26. Unlocking the Power of Pastel Dip Powder Gradient
Why It Works
The unique properties of dip powder make it an excellent choice for creating pastel gradients. This technique yields a stronger, longer-lasting finish compared to regular polish, and in pastel shades, the result is a smooth, even, and deeply pigmented finish that often eludes gel and regular polish.
How to Do It
Begin by dipping one section of the nail into the first pastel color, followed by dipping the adjacent section into the second, ensuring a slight overlap in the center. The dip process naturally creates blending at the boundary, requiring minimal additional effort.
27. Mastering the Art of Pastel Jelly Gradient
Why It Works
Jelly polishes, characterized by their sheer, translucent, gel-like quality, offer a distinct advantage when it comes to creating gradients. The sheerness allows for multiple layers to build depth gradually, resulting in a final effect that resembles stained glass: colorful, luminous, and delicate.
How to Do It
To achieve this stunning effect, apply three to four thin coats, concentrating more coats of the deeper shade in the base zone and fewer coats near the tip. The translucent nature of jelly polish means each layer adds color without obscuring the ones beneath, allowing the gradient to build itself slowly and beautifully.
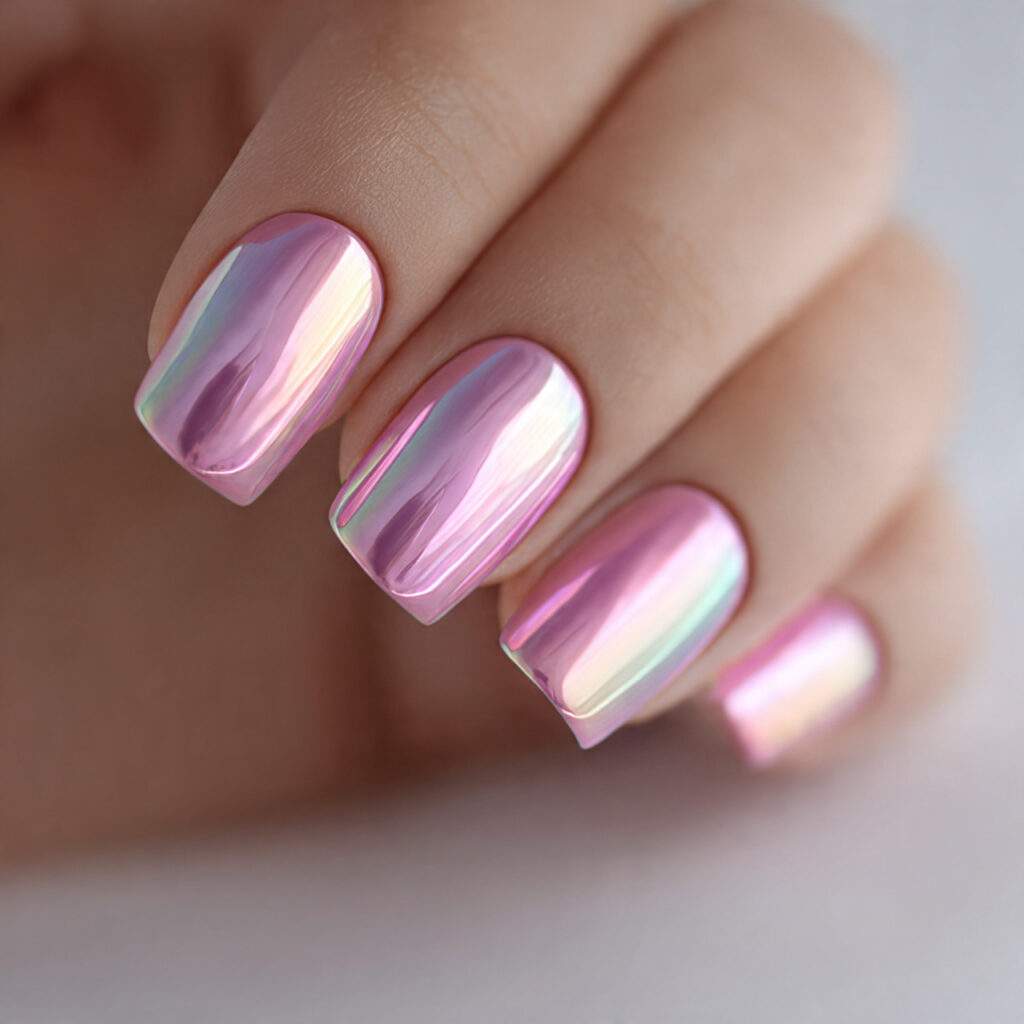
28. The Allure of Pastel Mirror Ombré
Why It Works
Mirror chrome applied in gradient form, with more coverage at the base fading to less at the tip, or in two different chrome pastel shades blending at the center, creates a look that’s both soft and high-impact. This is undoubtedly the most advanced look in this guide and one of the most breathtaking.
How to Do It
Apply chrome powder more heavily in the base zone and dust gradually lighter toward the tip. Alternatively, use two chrome powders, such as pink chrome and blue chrome, meeting in the center and dusted gently until they melt into each other.
29. Creating a Full Hand Pastel Spectrum With Accent Art
30. Tips for a Seamless Transition
Why It Works
Achieving a seamless transition between pastel shades requires attention to detail and a bit of finesse. By taking the time to carefully blend the colors, you can create a look that’s both elegant and sophisticated.
How to Do It
Start by applying a base coat to protect your nails, then proceed to apply the pastel shades, blending each one carefully into the next. Use a gentle touch to ensure a smooth, even finish, and seal with a top coat to lock in the color.
31. Accent Art for the Win
Why It Works
Adding accent art to your pastel gradient can elevate the entire look and make it truly unique. By incorporating decorative elements, you can add an extra layer of visual interest and create a truly show-stopping effect.
How to Do It
Use a nail art brush to apply a contrasting color or pattern to specific areas of the nail, such as the tip or the cuticle. You can also experiment with different shapes and designs to add an extra layer of creativity to your look.
32. Pastel Holographic Gradient

Why It Works
Pastel holographic gradient is a game-changer when it comes to nail art. The combination of holographic flakes and pastel shades creates a look that’s both modern and eye-catching.
How to Do It
Apply a holographic top coat over a pastel gradient to create a look that’s both futuristic and beautiful. You can also experiment with different holographic flakes and pastel shades to create a unique and personalized effect.
33. Pastel Glitter Gradient
Why It Works
Pastel glitter gradient is a fun and playful twist on traditional nail art. The combination of pastel shades and glitter creates a look that’s both whimsical and eye-catching.
How to Do It
Apply a glitter top coat over a pastel gradient to create a look that’s both fun and beautiful. You can also experiment with different glitter sizes and shapes to add an extra layer of visual interest to your look.
34. Pastel Chrome Gradient
Why It Works
Pastel chrome gradient is a sophisticated and elegant look that’s perfect for special occasions. The combination of pastel shades and chrome creates a look that’s both luxurious and high-end.
How to Do It
Apply a chrome powder over a pastel gradient to create a look that’s both modern and beautiful. You can also experiment with different chrome shades and pastel combinations to create a unique and personalized effect.
35. Pastel Ombre Stamping
Why It Works
Pastel ombre stamping is a unique and creative way to add some visual interest to your nail art. The combination of pastel shades and stamping creates a look that’s both modern and eye-catching.
How to Do It
Use a stamping plate and a pastel polish to create a look that’s both unique and beautiful. You can also experiment with different stamping patterns and pastel combinations to add an extra layer of creativity to your look.
36. Pastel Marble Gradient
Why It Works
Pastel marble gradient is a stunning and elegant look that’s perfect for special occasions. The combination of pastel shades and a marble effect creates a look that’s both sophisticated and high-end.
How to Do It
Apply a marble effect top coat over a pastel gradient to create a look that’s both beautiful and unique. You can also experiment with different marble effects and pastel combinations to add an extra layer of visual interest to your look.
37. Pastel Holographic Chrome Gradient
Why It Works
Pastel holographic chrome gradient is a game-changer when it comes to nail art. The combination of holographic flakes, chrome, and pastel shades creates a look that’s both modern and eye-catching.
How to Do It
Apply a holographic top coat over a chrome powder and pastel gradient to create a look that’s both futuristic and beautiful. You can also experiment with different holographic flakes, chrome shades, and pastel combinations to create a unique and personalized effect.
The Masterpiece of Hues
A harmonious blend of colors on both hands unfolds as each nail traverses the full spectrum of pastel shades, from coral to lavender, with the ring finger nails boasting an added touch of elegance: a delicate pearl, a micro flower, or a fine gold line. The spectrum serves as the main attraction, while the accent takes center stage, creating a signature look.
The Essence of the Pastel Transition Aesthetic
This iconic nail set embodies the very essence of the pastel transition aesthetic: a symphony of colors, softness, intentionality, and a dash of personal flair that makes each wearer feel uniquely adored. It’s a look that commands attention, leaving onlookers spellbound and eager to take a closer look.
Effortless Elegance
The beauty of this look lies in its versatility – it’s perfect for any occasion, whether you’re celebrating a milestone, dressing up for a special event, or simply want to add a touch of whimsy to your everyday look. It’s a style that makes you feel like you’re treating yourself to something special every time you glance at your hands.
The Key to a Seamless Gradient
Regardless of the style you choose, mastering these fundamental techniques is the key to creating a gradient that looks intentional and polished. It’s what sets a homemade look apart from a truly stunning one.
The Unsung Hero of Nail Art
A small, fine-textured makeup sponge is the unsung hero of most nail gradient techniques. By applying paint in overlapping bands on the sponge and gently dabbing it onto the nail, you can achieve a smooth, even result. The key is to build up four to six layers of sponge application, rather than sweeping or dragging the colors.
The Power of a Sheer Base
Most pastel gradients benefit from a sheer white or milky base, which provides a clean canvas for the colors to shine against. This subtle base makes the colors appear more vibrant and the transition more visible. Apply and let dry fully before adding the gradient on top for the best results.
The Finishing Touches
Gradient techniques often leave behind a messy residue around the nail edges, but with a little finesse, you can transform this into a clean, professional look. Use a thin brush dipped in acetone to carefully erase any excess material from the cuticle and side walls after everything has dried.
The Secret to a Glass-Like Finish
The secret to making pastel gradients truly shine lies in the finishing touch: two coats of glossy top coat. Apply the first coat, let it dry, and then add a second coat to fill in any remaining texture from the sponge application. This glass-like finish is the hallmark of a truly polished look that’s sure to turn heads.
Mistakes to Steer Clear of When Mastering Pastel Transition Nails
A few pitfalls can prevent you from achieving the perfect gradient, even with the right techniques in place.
Selecting colors that are too similar in tone is the most prevalent problem. When both shades are equally light and pale, the gradient becomes imperceptible, and the nail appears as a single hue. You require a sufficient tonal difference between your two shades for the transition to be visually striking.
Working at a snail’s pace is another common issue. Pastel polishes tend to dry quickly, especially when applied in thin layers. If you take too long between sponge applications, the layers cease to blend and instead start layering on top of each other, resulting in an undesirable texture rather than a smooth gradient. Adopt a steady, moderately paced workflow.
Why Pastel Transition Nails Bring Unbridled Joy to Fingertips
One of the most genuine aspects of pastel transition nails is their capacity to elicit happiness. Not only do those wearing them feel a sense of joy, but those who witness them do as well. There’s something inherently uplifting about soft, blended colors that evokes feelings of hope and renewal, akin to the arrival of spring or the warmth of a sunrise after a gentle rain.
This emotional impact shouldn’t be underestimated. Beauty that positively influences one’s mood and the moods of those around them holds significant value.
Whether you opt for a simple lavender-to-blush gradient on short oval nails or a stunning full-hand pastel spectrum with pearl accents on long coffin nails, the end result is the same: nails that exude thoughtfulness and care in how you present yourself to the world.